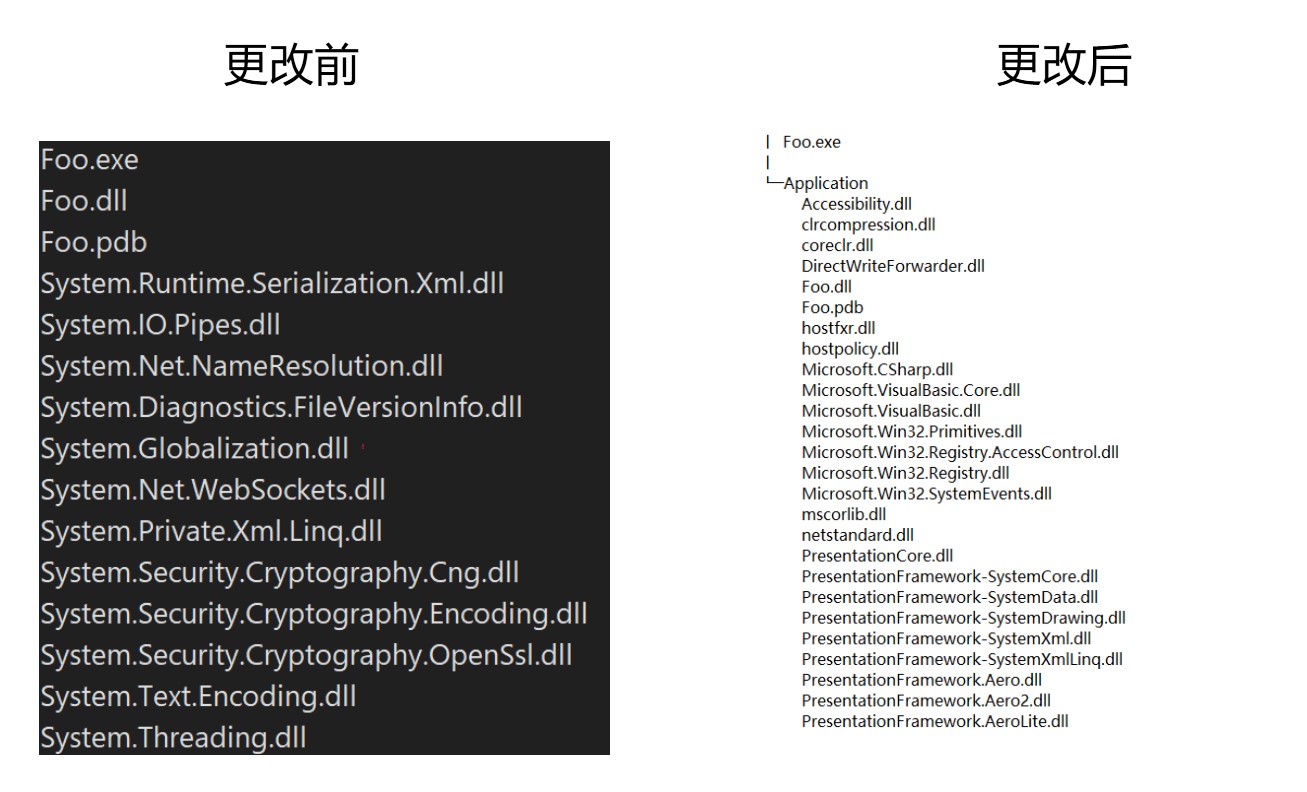
在 dotnet 的输出路径里面,可以看到有一个有趣的可执行文件,这个可执行文件是如何在框架发布和独立发布的时候,找到 dotnet 程序的运行时的,这个可执行文件里面包含了哪些内容
在回答上面的问题之前,请大家尝试打开 C:\Program Files\dotnet\sdk\5.0.100\AppHostTemplate\ 这个文件夹。当然了,请将 dotnet 版本号修改为你本机的版本号。在这个文件夹里面,可以看到有一个文件叫 apphost.exe 的可执行文件。有趣的是在咱的 dotnet 项目的 obj 文件夹下也能找到叫这个名字的这个文件
更有趣的是在咱的 dotnet 项目的 obj 文件夹下的 apphost.exe 可执行文件和最终输出的可执行文件是相同的一个文件
这有什么联系呢? 回答这个问题需要从 dotnet 的代码开始。在 GitHub 完全开源的 dotnet 源代码仓库 https://github.com/dotnet/runtime 里面,将代码拉到本地,可以在 dotnet runtime\src\installer\corehost\ 文件里面看到很多有趣的逻辑
没错,其实 apphost.exe 的核心逻辑就放在 dotnet runtime\src\installer\corehost\ 文件里面
打开 dotnet runtime\src\installer\corehost\corehost.cpp 文件,可以看到一段有趣的注释
/** * Detect if the apphost executable is allowed to load and execute a managed assembly. * * - The exe is built with a known hash string at some offset in the image * - The exe is useless as is with the built-in hash value, and will fail with an error message * - The hash value should be replaced with the managed DLL filename with optional relative path * - The optional path is relative to the location of the apphost executable * - The relative path plus filename are verified to reference a valid file * - The filename should be "NUL terminated UTF-8" by "dotnet build" * - The managed DLL filename does not have to be the same name as the apphost executable name * - The exe may be signed at this point by the app publisher * - Note: the maximum size of the filename and relative path is 1024 bytes in UTF-8 (not including NUL) * o https://en.wikipedia.org/wiki/Comparison_of_file_systems * has more details on maximum file name sizes. */在 dotnet runtime\src\installer\corehost\corehost.cpp 文件的 exe_start 大概就是整个可执行文件的入口方法了,在这里实现的功能将包含使用 hostfxr 和 hostpolicy 来托管执行整个 dotnet 进程,以及主函数的调起。而在使用托管之前,需要先寻找 dotnet_root 也就是 dotnet 框架用来承载整个 dotnet 进程
上面的逻辑的核心代码如下
const pal::char_t* dotnet_root_cstr = fxr.dotnet_root().empty() ? nullptr : fxr.dotnet_root().c_str(); rc = hostfxr_main_bundle_startupinfo(argc, argv, host_path_cstr, dotnet_root_cstr, app_path_cstr, bundle_header_offset);而在进行独立发布的时候,其实会在创建 fxr 对象的时候传入 app_root 路径,如下面代码
hostfxr_resolver_t fxr{app_root};在 dotnet core 里面,和 dotnet framework 不同的是,在 dotnet core 的可执行程序没有使用到系统给的黑科技,是一个完全的 Win32 应用程序,在双击 exe 的时候,将会执行一段非托管的代码,在进入到 corehost.cpp 的 exe_start 函数之后。将会开始寻找 dotnet 托管入口,以及 dotnet 运行时,通过 hostfxr 的方式加载运行时组件,然后跑起来托管应用
那么在 dotnet 构建输出的可执行文件又是什么?其实就是包含了 corehost.cpp 逻辑的 AppHost.exe 文件的魔改。在 corehost.cpp 构建出来的 AppHost.exe 文件,是不知道开发者的最终输出包含入口的 dll 是哪个的,需要在构建过程中传入给 AppHost.exe 文件。而 AppHost.exe 文件是固定的二进制文件,不接受配置等方式,因此传入的方法就是通过修改二进制的内容了
这也就是为什么 AppHost.exe 放在 AppHostTemplate 文件夹的命名原因,因为这个 C:\Program Files\dotnet\sdk\5.0.100\AppHostTemplate\ 文件夹的 AppHost.exe 是一个 Template 模版而已,在 corehost.cpp 文件里面,预定了一段大概是 1025 长度的空间用来存放 dotnet 入口 dll 路径名。这个代码就是本文上面给的很长的注释下面的代码
#define EMBED_HASH_HI_PART_UTF8 "c3ab8ff13720e8ad9047dd39466b3c89" // SHA-256 of "foobar" in UTF-8#define EMBED_HASH_LO_PART_UTF8 "74e592c2fa383d4a3960714caef0c4f2" // 这两句代码就是 foobar 的 UTF-8 二进制的 SHA-256 字符串#define EMBED_HASH_FULL_UTF8    (EMBED_HASH_HI_PART_UTF8 EMBED_HASH_LO_PART_UTF8) // NUL terminated
bool is_exe_enabled_for_execution(pal::string_t* app_dll){    constexpr int EMBED_SZ = sizeof(EMBED_HASH_FULL_UTF8) / sizeof(EMBED_HASH_FULL_UTF8[0]);    // 这里给的是就是最长 1024 个 byte 的 dll 名,加上一个 \0 一共是 1025 个字符    constexpr int EMBED_MAX = (EMBED_SZ > 1025 ? EMBED_SZ : 1025); // 1024 DLL name length, 1 NUL
    // 这就是定义在 AppHost.exe 二进制文件里面的一段空间了,长度就是 EMBED_MAX 长度,内容就是 c3ab8ff13720e8ad9047dd39466b3c8974e592c2fa383d4a3960714caef0c4f2 这段字符串    static char embed[EMBED_MAX] = EMBED_HASH_FULL_UTF8;     // series of NULs followed by embed hash string
    static const char hi_part[] = EMBED_HASH_HI_PART_UTF8;    static const char lo_part[] = EMBED_HASH_LO_PART_UTF8;
    // 将 embed 的内容复制到 app_dll 变量里面    pal::clr_palstring(embed, app_dll);}

int exe_start(const int argc, const pal::char_t* argv[]){  // 读取嵌入到二进制文件的 App 名,也就是 dotnet 的入口 dll 路径,可以是相对也可以是绝对路径    pal::string_t embedded_app_name;    if (!is_exe_enabled_for_execution(&embedded_app_name))    {        trace::error(_X("A fatal error was encountered. This executable was not bound to load a managed DLL."));        return StatusCode::AppHostExeNotBoundFailure;    }
    // 将 embedded_app_name 的内容赋值给 app_path 变量,这个变量的定义代码我没有写    append_path(&app_path, embedded_app_name.c_str());
    const pal::char_t* app_path_cstr = app_path.empty() ? nullptr : app_path.c_str();    // 跑起来 dotnet 应用    rc = hostfxr_main_bundle_startupinfo(argc, argv, host_path_cstr, dotnet_root_cstr, app_path_cstr, bundle_header_offset);}
上面代码不是实际的 corehost.cpp 的代码,只是为了方便本文描述而修改的代码
在实际输出的 dotnet 可执行文件里面的逻辑是先从 C:\Program Files\dotnet\sdk\5.0.100\AppHostTemplate\ 文件夹复制 AppHost.exe 出来,接着依靠上面代码的 static char embed[EMBED_MAX] = EMBED_HASH_FULL_UTF8; 的逻辑,替换二进制文件的 embed 值的内容
在 dotnet runtime\src\installer\managed\Microsoft.NET.HostModel\AppHost\HostWriter.cs 文件中,将包含实际的替换逻辑,代码如下
    /// <summary>    /// Embeds the App Name into the AppHost.exe    /// If an apphost is a single-file bundle, updates the location of the bundle headers.    /// </summary>    public static class HostWriter    {        /// <summary>        /// hash value embedded in default apphost executable in a place where the path to the app binary should be stored.        /// </summary>        private const string AppBinaryPathPlaceholder = "c3ab8ff13720e8ad9047dd39466b3c8974e592c2fa383d4a3960714caef0c4f2";        private static readonly byte[] AppBinaryPathPlaceholderSearchValue = Encoding.UTF8.GetBytes(AppBinaryPathPlaceholder);
        /// <summary>        /// Create an AppHost with embedded configuration of app binary location        /// </summary>        /// <param name="appHostSourceFilePath">The path of Apphost template, which has the place holder</param>        /// <param name="appHostDestinationFilePath">The destination path for desired location to place, including the file name</param>        /// <param name="appBinaryFilePath">Full path to app binary or relative path to the result apphost file</param>        /// <param name="windowsGraphicalUserInterface">Specify whether to set the subsystem to GUI. Only valid for PE apphosts.</param>        /// <param name="assemblyToCopyResorcesFrom">Path to the intermediate assembly, used for copying resources to PE apphosts.</param>        public static void CreateAppHost(            string appHostSourceFilePath,            string appHostDestinationFilePath,            string appBinaryFilePath,            bool windowsGraphicalUserInterface = false,            string assemblyToCopyResorcesFrom = null)        {            var bytesToWrite = Encoding.UTF8.GetBytes(appBinaryFilePath);            if (bytesToWrite.Length > 1024)            {                throw new AppNameTooLongException(appBinaryFilePath);            }
            void RewriteAppHost()            {                // Re-write the destination apphost with the proper contents.                using (var memoryMappedFile = MemoryMappedFile.CreateFromFile(appHostDestinationFilePath))                {                    using (MemoryMappedViewAccessor accessor = memoryMappedFile.CreateViewAccessor())                    {                        BinaryUtils.SearchAndReplace(accessor, AppBinaryPathPlaceholderSearchValue, bytesToWrite);
                        appHostIsPEImage = PEUtils.IsPEImage(accessor);
                        if (windowsGraphicalUserInterface)                        {                            if (!appHostIsPEImage)                            {                                throw new AppHostNotPEFileException();                            }
                            PEUtils.SetWindowsGraphicalUserInterfaceBit(accessor);                        }                    }                }            }
            // 忽略代码        }    }
可以看到在 HostWriter 的逻辑就是找到 AppHost.exe 里面的 private const string AppBinaryPathPlaceholder = "c3ab8ff13720e8ad9047dd39466b3c8974e592c2fa383d4a3960714caef0c4f2"; 二进制内容,替换为 appBinaryFilePath 的内容
而除了这个之外,还有其他的逻辑就是包含一些资源文件,如图标和程序清单等,将这些内容放入到 AppHost.exe 里面,这就是实际的输出文件了
利用这个机制,咱可以更改可执行程序的内容,让可执行程序文件,寻找其他路径下的 dll 文件作为 dotnet 程序的入口,大概就可以实现将 exe 放在文件夹外面,而将 dll 放在文件夹里面的效果。原先的输出就是让 exe 和 dll 都在相同的一个文件夹,这样看起来整个文件夹都很乱。也不利于进行 OTA 静默升级。而将入口 exe 文件放在 dll 所在文件夹的外面,可以让整个应用文件夹看起来更加清真

想要达成这个效果很简单,如上面描述的原理,可以通过修改 AppHost.exe 文件的二进制内容,设置入口 dll 的路径来实现
更改方法就是抄 HostWriter 的做法,替换 exe 里面对应的二进制内容,我从 dnSpy 里面抄了一些代码,魔改之后放在 github 欢迎小伙伴访问
在拉下来 AppHostPatcher 之后,进行构建,此时的 AppHostPatcher 是一个命令行工具应用,支持将最终输出的 exe 文件进行魔改。传入的命令行参数只有两个,一个是可执行文件的路径,另一个就是新的 dll 所在路径。如下面代码
AppHostPatcher.exe Foo.exe .\Application\Foo.dll此时原本的 Foo.exe 将会寻找相同文件夹下的 Foo.dll 文件作为 dotnet 的入口程序集,而在执行上面代码之后,双击 Foo.exe 将会寻找 Application\Foo.dll 作为入口程序集,因此就能将整个文件夹的内容,除了 exe 之外的其他文件放在其他文件夹里面
基于此,我开发了两个应用:
- 我开发了 PublishFolderCleaner 工具,此工具可以让你的输出文件夹更整洁,详细请看 PublishFolderCleaner 让你的 dotnet 应用发布文件夹更加整洁
- 使用此功能提升软件更新之后的对用户端的变更优化方式,详细请看 dotnet 桌面端基于 AppHost 的配置式自动切换更新后的应用程序路径
更多细节请看 Write a custom .NET Core runtime host
本文以上使用的代码是在 https://github.com/dotnet/runtime 的 v5.0.0-rtm.20519.4 版本的代码
如果想要完全理解 dotnet 应用的启动过程,请看 dotnet core 应用是如何跑起来的 通过自己写一个 dotnet host 理解运行过程

本作品采用 知识共享署名-非商业性使用-相同方式共享 4.0 国际许可协议 进行许可。 欢迎转载、使用、重新发布,但务必保留文章署名 林德熙 (包含链接: https://blog.lindexi.com ),不得用于商业目的,基于本文修改后的作品务必以相同的许可发布。如有任何疑问,请与我 联系。